Recently, I have been setting up a lot of Linux boxes on a closed internal network. For scaling and maintainability, I decided to setup OpenLDAP to federate all of the Linux boxes together. This was pretty straight-forward after I sifted through all of the documentation. There are many resources on the web that will give you step-by-step pointers on how to set it up. Unfortunately, they have many issues with them.
Some issues would include:
- LDAP TLS connectivity is required in newer version of Linux (Redhat 6+, Fedora 20 / 21, etc.)
- Creation of the TLS certificates based on the site you go to is either dead wrong, slightly wrong, or marginally accurate.
- None of the links I found accurately described how to test if your TLS configuration is working.
- Some authors suggest editing the /etc/sysconfig/authconfig file and setting FORCELEGACY=yes (Fixes the TLS mandatory requirement). This is a bad idea.... if you really want to do this do it in sssd.conf don't pollute the whole OS. Edit /etc/sssd/sssd.conf in the [domain/default] section: ldap_tls_reqcert = never.
- Some authors suggest turning off SELinux to get LDAP to work...huh? BAD IDEA!
- Some authors suggest editing the /etc/openldap/slapd.d files (i.e. cn=config files) directly. This is not correct. You need to use ldapmodify to edit these. Otherwise you corrupt the CRC on the files, which is an integrity check for unauthorized modification. Sure they will load... with a warning.... but its not right. The first line clearly states:
- # AUTO-GENERATED FILE - DO NOT EDIT!! Use ldapmodify.
- Multiple methods of integrating LDAP which don't mix and match. (pam_ldap, nss-pam-ldapd, nss_ldap, sssd_ldap...etc)
- Various other things.....
Basically, what you get on the internet is roughly worth what you paid for it..... :-(
Now, that said... nobody is paying me either. So, what I am going to detail is a very basic configuration of LDAP (for now... I'll add more later...I hope).
This configuration will be:
- Encrypted using self-signed certs
- Allow users to login on any LDAP configured client/server
WARNING: This configuration will not be fully functional (it will allow you to login on multiple nodes, control SUDO, and control password policy, but:
- It will NOT cover setting up the newer (OLC, cn=config) model of
the LDAP config. We will use the standard slapd.conf file for ease of
explanation. It is important to migrate to the (OLC, cn=config) since it
was introduced in OpenLDAP 2.3 and will be a forced upgrade soon.
(Later, I'll update how to use this)
- Password policy is additionally controlled via PAM using the setting for pam_cracklib and pam_unix in your /etc/pam.d/system-auth (or system-auth-ac) file. Something like this on all nodes in your architecture:
password required pam_cracklib.so retry=3 minlen=14 dcredit=-2 ucredit=-2 ocredit=-2 lcredit=-2 difok=4 maxclassrepeat=3
password sufficient pam_unix.so min=14 remember=24 sha512 shadow nullok try_first_pass use_authtok
password sufficient pam_sss.so use_authtok
password required pam_deny.so
This tutorial will use the built-in System Security Services Daemon(sssd) and the Pluggable Authentication Module (PAM) that come with Fedora 20 and Redhat 6.5 (any Linux really natively). Redhat and Fedora have a few differences, but I'll detail them in the install process.
Note: All steps below are conducted as root.
SERVER SETUP
Step 1) Install the required modules using YUM
- OpenSSL used for certificate testing and creation
- gnutls-utils used for certificate testing
- openldap-servers libraries for the LDAP Server
- openldap-clients libraries used on both the server and clients
[root@demo juser]#
yum install openssl gnutls-utils openldap-servers openldap-clients
=================================================================================================
Package Arch Version Repository Size
=================================================================================================
Installing:
gnutls-utils x86_64 3.1.28-1.fc20 updates 191 k
openldap-clients x86_64 2.4.39-4.fc20 updates 186 k
openldap-servers x86_64 2.4.39-4.fc20 updates 2.1 M
Updating:
openssl x86_64 1:1.0.1e-41.fc20 updates 707 k
Installing for dependencies:
autogen-libopts x86_64 5.18-1.fc20 fedora 65 k
gnutls-dane x86_64 3.1.28-1.fc20 updates 52 k
Updating for dependencies:
openssl-libs x86_64 1:1.0.1e-41.fc20 updates 919 k
Transaction Summary
=================================================================================================
Install 3 Packages (+2 Dependent packages)
Upgrade 1 Package (+1 Dependent package)
NOTE: If you want SUDO to work/be controlled via LDAP.
1) You need to install
sssd-common. (yum install sssd-common)
2)
copy /usr/share/doc/sudo-1.8.6p3/schema.OpenLDAP to /etc/openldap/schema/schema.OpenLDAP. (OpenLDAP Server only)
3) Edit /etc/sssd/sssd.conf and add:
#### In the [domain/default] section #####
sudo_provider=ldap
ldap_sudo_search_base=ou=SUDOers,dc=pomacintegrations,dc=com
ldap_sudo_full_refresh_interval=86400
ldap_sudo_smart_refresh_interval=3600
#### In the [sssd] section #####
services = nss, pam, sudo
4) Edit /etc/nsswitch/conf and add:
sudoers: files sss
5) In /etc/openldap/ldap.conf add
sudoers_base ou=SUDOers,dc=pomacintegrations,dc=com
Step 2) Generate a default password to use with slappasswd. You can use my encrypted pattern, if you want. If you choose to do it with the same word, the encrypted text will differ due to salting of the password, it is output as salted SHA.
[root@demo juser]#
slappasswd
New password: HelloWorld
Re-enter new password: HelloWorld
{SSHA}U1PvxYKpmMLQ7IeGgFhr0vahphVmbho8
Step 3) Configure /etc/openldap/ldap.conf
[root@demo juser]#
nano /etc/openldap/ldap.conf
Here is a copy of my file:
#
# LDAP Defaults
#
# See ldap.conf(5) for details
# This file should be world readable but not world writable.
#BASE dc=example,dc=com
#URI ldap://ldap.example.com ldap://ldap-master.example.com:666
#SIZELIMIT 12
#TIMELIMIT 15
#DEREF never
ssl start_tls
TLS_CACERTDIR /etc/openldap/certs
TLS_REQCERT allow
BASE dc=example,dc=com
# for the next two items
# mine is 192.168.1.18
URI ldaps://192.168.1.18
HOST 192.168.1.18
# Turning this off breaks GSSAPI used with krb5 when rdns = false
SASL_NOCANON on
# If your were adding sudo via LDAP... otherwise leave this line out
sudoers_base ou=SUDOers,dc=pomacintegrations,dc=com
pam_filter objectClass=posixAccount
pam_lookup_policy yes
Step 4) Configure /etc/openldap/slaps.conf
NOTE: The below file will work on both Redhat and Fedora. Redhat comes with a sample file in you can copy over with:
[root@demo juser]#
cp /usr/share/openldap-servers/slapd.conf.obsolete /etc/openldap/slapd.conf
(COMMAND WILL NOT WORK ON FEDORA)
Fedora comes with a slapd.ldif file, as they expect you to use the (OLC, cn=config) model to setup the instance. I'm not covering right now ... so use the below file.
[root@demo juser]#
nano /etc/openldap/slapd.conf
I have highlighted in red below the lines that need to change or may need to change. The key paths and filenames, if you use my commands will match. Password will change... please don't use HelloWorld!. Your domain will change... unless you are setting up "pomacintegrations.com"....
Here is a copy of the slapd.conf file:
#
# See slapd.conf(5) for details on configuration options.
# This file should NOT be world readable.
#
include /etc/openldap/schema/corba.schema
include /etc/openldap/schema/core.schema
include /etc/openldap/schema/cosine.schema
include /etc/openldap/schema/duaconf.schema
include /etc/openldap/schema/dyngroup.schema
include /etc/openldap/schema/inetorgperson.schema
include /etc/openldap/schema/java.schema
include /etc/openldap/schema/misc.schema
include /etc/openldap/schema/nis.schema
include /etc/openldap/schema/openldap.schema
include /etc/openldap/schema/ppolicy.schema
include /etc/openldap/schema/collective.schema
# For SUDO Policy to work
include /etc/openldap/schema/schema.OpenLDAP
# Allow LDAPv2 client connections. This is NOT the default.
allow bind_v2
# Do not enable referrals until AFTER you have a working directory
# service AND an understanding of referrals.
#referral ldap://root.openldap.org
pidfile /var/run/openldap/slapd.pid
argsfile /var/run/openldap/slapd.args
# Load dynamic backend modules
# - modulepath is architecture dependent value (32/64-bit system)
# - back_sql.la overlay requires openldap-server-sql package
# - dyngroup.la and dynlist.la cannot be used at the same time
# modulepath /usr/lib/openldap
# modulepath /usr/lib64/openldap
# moduleload accesslog.la
# moduleload auditlog.la
# moduleload back_sql.la
# moduleload chain.la
# moduleload collect.la
# moduleload constraint.la
# moduleload dds.la
# moduleload deref.la
# moduleload dyngroup.la
# moduleload dynlist.la
# moduleload memberof.la
# moduleload pbind.la
# moduleload pcache.la
moduleload ppolicy.la
# moduleload refint.la
# moduleload retcode.la
# moduleload rwm.la
# moduleload seqmod.la
# moduleload smbk5pwd.la
# moduleload sssvlv.la
# moduleload syncprov.la
# moduleload translucent.la
# moduleload unique.la
# moduleload valsort.la
# The next three lines allow use of TLS for encrypting connections using a
# dummy test certificate which you can generate by running
# /usr/libexec/openldap/generate-server-cert.sh. Your client software may balk
# at self-signed certificates, however.
TLSCACertificateFile /etc/openldap/cacerts/ca-bundle.crt
TLSCertificateFile /etc/openldap/certs/slapd.pem
TLSCertificateKeyFile /etc/openldap/certs/slapd.pem
TLSCipherSuite HIGH:MEDIUM:-SSLv2
#######################################################################
# database definitions
#######################################################################
database bdb
suffix "dc=pomacintegrations,dc=com"
checkpoint 1024 15
rootdn "cn=Manager,dc=pomacintegrations,dc=com"
# HelloWorld from Step 2.
rootpw {SSHA}U1PvxYKpmMLQ7IeGgFhr0vahphVmbho8
loglevel 256
sizelimit unlimited
# Cleartext passwords, especially for the rootdn, should
# be avoided. See slappasswd(8) and slapd.conf(5) for details.
# Use of strong authentication encouraged.
# rootpw secret
# rootpw {crypt}ijFYNcSNctBYg
overlay ppolicy
ppolicy_default "cn=default,ou=policies,dc=pomacintegrations,dc=com"
# The database directory MUST exist prior to running slapd AND
# should only be accessible by the slapd and slap tools.
# Mode 700 recommended.
directory /var/lib/ldap
# Indices to maintain for this database
index objectClass eq,pres
index ou,cn,mail,surname,givenname eq,pres,sub
index uidNumber,gidNumber,loginShell eq,pres
index uid,memberUid eq,pres,sub
index nisMapName,nisMapEntry eq,pres,sub
# Replicas of this database
#replogfile /var/lib/ldap/openldap-master-replog
#replica host=ldap-1.example.com:389 starttls=critical
# bindmethod=sasl saslmech=GSSAPI
# authcId=host/ldap-master.example.com@EXAMPLE.COM
# Sample security restrictions
# Require integrity protection (prevent hijacking)
# Require 112-bit (3DES or better) encryption for updates
# Require 63-bit encryption for simple bind
# security ssf=1 update_ssf=112 simple_bind=64
##############################################
##### START ACL RULES FOR DATABASE ########
##############################################
access to attrs="userPassword"
by anonymous auth
by self write
by set="[cn=ldapOSAdmin,ou=Groups,dc=pomacintegrations,dc=com]/memberUid & user/uid" write
by * none
access to attrs="pwdReset"
by set="[cn=ldapOSAdmin,ou=Groups,dc=pomacintegrations,dc=com]/memberUid & user/uid" write
by * read
access to attrs=uid,cn,objectClass,loginShell,homeDirectory,uidNumber,gidNumber
by * read
access to *
by self write
by * read
##############################################
###### END ACL RULES FOR DATABASE #########
##############################################
Step 5) FEDORA: Configure /etc/sysconfig/slapd or REDHAT Configure /etc/sysconfig/ldap
Here is a copy of the /etc/sysconfig/slapd file: (/etc/sysconfig/lapd on Redhat)
[root@demo juser]#
nano /etc/sysconfig/slapd
# OpenLDAP server configuration
# see 'man slapd' for additional information
# Where the server will run (-h option)
# - ldapi:/// is required for on-the-fly configuration using client tools
# (use SASL with EXTERNAL mechanism for authentication)
# - default: ldapi:/// ldap:///
# - example: ldapi:/// ldap://127.0.0.1/ ldap://10.0.0.1:1389/ ldaps:///
SLAPD_URLS="ldapi:/// ldap:/// ldaps:///"
# DEPRICATED COMMANDS, SLAPD_URLS is current
#SLAPD_LDAP="yes"
#SLAPD_LDAPI="yes"
#SLAPD_LDAPS="yes"
# Any custom options
#SLAPD_OPTIONS=""
# Keytab location for GSSAPI Kerberos authentication
#KRB5_KTNAME="FILE:/etc/openldap/ldap.keytab"
Step 6) Initialize an empty LDAP Berkeley DB and clean up slapd.d
[root@demo juser]#
rm -rf /var/lib/ldap/*
[root@demo juser]#
rm -rf /etc/openldap/slapd.d/*
[root@demo juser]#
cp /usr/share/openldap-servers/DB_CONFIG.example /var/lib/ldap/DB_CONFIG
[root@demo juser]#
echo "" | slapadd -f /etc/openldap/slapd.conf
(This is a cheat... I should be using slapadd, but since I'm not covering (OLC, cn=config) mode...)
[root@demo juser]#
slaptest -f /etc/openldap/slapd.conf -F /etc/openldap/slapd.d
[root@demo juser]#
chown -Rf ldap. /etc/openldap/slapd.d/
[root@demo juser]#
chown -Rf ldap. /var/lib/ldap/
[root@demo juser]#
chmod 700 /var/lib/ldap/
[root@demo juser]#
chmod 700 /etc/openldap/slapd.d/
Step 7) Set permissions on files conf. files and mv slapd.d config
[root@demo juser]#
chown ldap. /etc/openldap/slapd.conf
[root@demo juser]#
chown ldap. /etc/openldap/ldap.conf
[root@demo juser]#
mv /etc/openldap/slapd.d /etc/openldap/slapd.d.IGNORE_FOR_NOW
Step 8) Create the TLS Certificates
In this step, I'm going to create some "generic" TLS certificates that are self signed. The certificate will only be valid for 365 days. This is NOT the best way to do this. Ideally, you will get certs from your hosting provider or a registered Certificate Authority. This method will work, but the certs are signed with the default CA certificate that comes with all Linux distro. Thus, the key... isn't the greatest... from a trust standpoint.
I want to avoid Certificate issues in this posting... so I'm using these certs.
[root@demo juser]#
cd /etc/pki/tls/certs
[root@demo certs]#
make slapd.pem
umask 77 ; \
PEM1=`/bin/mktemp /tmp/openssl.XXXXXX` ; \
PEM2=`/bin/mktemp /tmp/openssl.XXXXXX` ; \
/usr/bin/openssl req -utf8 -newkey rsa:2048 -keyout $PEM1 -nodes -x509 -days 365 -out $PEM2 -set_serial 0 ; \
cat $PEM1 > slapd.pem ; \
echo "" >> slapd.pem ; \
cat $PEM2 >> slapd.pem ; \
rm -f $PEM1 $PEM2
Generating a 2048 bit RSA private key
.....................................................................................+++
......................................................................................................................................................+++
writing new private key to '/tmp/openssl.wdZreJ'
-----
You are about to be asked to enter information that will be incorporated
into your certificate request.
What you are about to enter is what is called a Distinguished Name or a DN.
There are quite a few fields but you can leave some blank
For some fields there will be a default value,
If you enter '.', the field will be left blank.
-----
Country Name (2 letter code) [XX]:US
State or Province Name (full name) []:YOUR_STATE_HERE
Locality Name (eg, city) [Default City]:YOUR_CITY_HERE
Organization Name (eg, company) [Default Company Ltd]:YOUR_COMPANY_HERE
Organizational Unit Name (eg, section) []:BLANK_OR_FILL_IN
Common Name (eg, your name or your server's hostname) []:
Email Address []:
Step 9) Distribute TLS Certificates on the system into the correct folders
Note: You can use Symbolic links for this. I'm not in the tutorial. I'm just moving the files and making multiple copies of the files. This is to avoid confusion by folks trying to set this up.
[root@demo certs]#
mkdir /etc/openldap/cacerts
[root@demo certs]#
chown ldap. slapd.pem
[root@demo certs]#
mv slapd.pem /etc/openldap/certs/.
[root@demo certs]#
cp /etc/pki/tls/certs/ca-bundle.crt /etc/openldap/cacerts/.
[root@demo certs]#
chown ldap. /etc/openldap/cacerts/ca-bundle.crt
[root@demo certs]#
cp /etc/openldap/certs/slapd.pem /etc/openldap/cacerts/.
[root@demo certs]#
chown ldap. /etc/openldap/cacerts/slapd.pem
Step 10) Start the service and test the certificate connectivity
We are going to start the service:
[root@demo certs]# service slapd start
Redirecting to /bin/systemctl start slapd.service
(will look slightly different on Redhat when we start)
[root@demo certs]#
systemctl enable slapd
Check to see if Ports 389(LDAP) and 636(LDAPS) are bound:
[root@demo certs]# netstat -ntlup | grep slapd
tcp 0 0 0.0.0.0:636 0.0.0.0:* LISTEN 2445/slapd
tcp 0 0 0.0.0.0:389 0.0.0.0:* LISTEN 2445/slapd
tcp6 0 0 :::636 :::* LISTEN 2445/slapd
tcp6 0 0 :::389 :::* LISTEN 2445/slapd
Test Certificate: (Need to CNTRL-C out of this in Redhat)
[root@demo certs]# gnutls-cli -p 636 192.168.1.18
Processed 153 CA certificate(s).
Resolving '192.168.1.18'...
Connecting to '192.168.1.18:636'...
- Certificate type: X.509
- Got a certificate list of 1 certificates.
- Certificate[0] info:
- subject `C=US,ST=VA,L=Fairfax,O=POMAC Integrations Inc.,CN=192.168.1.18', issuer `C=US,ST=VA,L=Fairfax,O=POMAC Integrations Inc.,CN=192.168.1.18', RSA key 2048 bits, signed using RSA-SHA1, activated `2015-02-12 01:27:42 UTC', expires `2016-02-12 01:27:42 UTC', SHA-1 fingerprint `7f9d8be15a1fdeb88d9bc2f3b3f9e5f9870aa48b'
Public Key Id:
a6841e8e4ffb8f962a560f480527e1cdc5cd3891
Public key's random art:
+--[ RSA 2048]----+
| +o..o* |
| . =..E o |
| ..o . |
| . . |
| . .o . S |
| .+oo o |
| ..+o.. |
| oo .+. |
| . .++o.. |
+-----------------+
- Status: The certificate is NOT trusted. The certificate issuer is unknown.
*** Verifying server certificate failed...
*** Fatal error: Error in the certificate.
*** Handshake has failed
GnuTLS error: Error in the certificate.
You should get a certificate output like the above. Since it is self-signed, Fedora will really complain and terminate the connection. Redhat doesn't complain, as much, and will keep the connection open. In Redhat you will need to CNTRL-C to end the connection. (Don't worry, we have configured LDAP above to accept self-signed certs).
The above should all work. I have dryrun this on multiple platforms. The important thing here is that the certificate is received and printed out. If not, check the permissions on the files in /etc/openldap/certs and /etc/openldap/cacerts. They need to be owned by the LDAP users and readable. Verify that the cert paths provided in /etc/openldap/ldap and /etc/openldap/slapd.conf are accurate. Then, restart the slapd service (service slapd restart). Then, try connecting again. (i.e. make sure you followed the above steps :-/ )
Step 11) Create an LDIF file to populate LDAP with some groups and users
[root@demo certs]#
cd ~/
[root@demo certs]#
nano sample_org.ldif
Contents of the sample_org.ldif file
# Create a base for Directory Information Tree (DIT)
dn: dc=pomacintegrations,dc=com
objectClass: top
objectClass: dcObject
objectclass: organization
o: Pomac Integrations Organization
dc: pomacintegrations
description: POMAC Integrations Inc.
# Creates a Users OU (Organizational Unit)
dn: ou=Users,dc=pomacintegrations,dc=com
objectClass: organizationalUnit
ou: Users
# Creates a Groups OU
dn: ou=Groups,dc=pomacintegrations,dc=com
objectClass: organizationalUnit
ou: Groups
dn: ou=Admins,dc=pomacintegrations,dc=com
objectClass: organizationalUnit
ou: Admins
# Create a user cpoma with some basic info
dn: uid=cpoma,ou=Users,dc=pomacintegrations,dc=com
uid: cpoma
cn: cpoma
sn: 1
objectClass: top
objectClass: posixAccount
objectClass: inetOrgPerson
loginShell: /bin/bash
homeDirectory: /home/cpoma
uidNumber: 20001
gidNumber: 20001
# HelloWorld Password from Earlier
userPassword: {SSHA}U1PvxYKpmMLQ7IeGgFhr0vahphVmbho8
gecos: Craig Poma (XXX-XXX-XXXX)
dn: cn=cpoma,ou=Groups,dc=pomacintegrations,dc=com
objectClass: posixGroup
objectClass: top
cn: cpoma
gidNumber: 20001
memberuid: uid=cpoma
# Creates a ldapOSAdmin group under Groups OU for use
# in the /etc/sudoers file
dn: cn=ldapOSAdmin,ou=Groups,dc=pomacintegrations,dc=com
objectClass: posixGroup
objectClass: top
cn: ldapOSAdmin
gidNumber: 20000
memberuid: uid=cpoma
# Creates Policy Branch
dn: ou=SUDOers,dc=pomacintegrations,dc=com
objectClass: top
objectClass: organizationalUnit
ou: SUDOers
# Creates SUDOers Default Branch
dn: cn=default,ou=SUDOers,dc=pomacintegrations,dc=com
objectClass: top
objectClass: sudoRole
cn: default
description: SUDO Rules Container
sudoOption: env_keep+=SSH_AUTH_SOCK
# Creates Policy For User cpoma
dn: cn=sudo_cpoma,ou=SUDOers,dc=pomacintegrations,dc=com
objectClass: top
objectClass: sudoRole
cn: sudo_cpoma
sudoUser: cpoma
sudoHost: ALL
sudoCommand: ALL
#Creates Policy Branch for Passwords
dn: ou=policies,dc=pomacintegrations,dc=com
objectClass: top
objectClass: organizationalUnit
ou: policies
#Insert Default Policy
# 7 Days = 604800
# 15 minutes = 900
# 180 Days = 1555200
# 2 days = 172800
dn: cn=default,ou=policies,dc=pomacintegrations,dc=com
cn: default
objectClass: pwdPolicy
objectClass: device
objectClass: top
pwdMinLength: 14
pwdSafeModify: FALSE
pwdInHistory: 24
pwdAllowUserChange: TRUE
pwdAttribute: userPassword
pwdExpireWarning: 604800
pwdGraceAuthNLimit: 5
pwdLockout: TRUE
pwdLockoutDuration: 900
pwdMaxFailure: 5
pwdMaxAge: 15552000
pwdMinAge: 172800
pwdMustChange: TRUE
pwdCheckQuality: 1
Step 12) Populate the LDAP Database
[root@demo ~]#
ldapadd -x -D "cn=Manager,dc=pomacintegrations,dc=com" -W -f sample_org.ldif
Enter LDAP Password:
HelloWorld
adding new entry "dc=pomacintegrations,dc=com"
adding new entry "ou=Users,dc=pomacintegrations,dc=com"
adding new entry "ou=Groups,dc=pomacintegrations,dc=com"
adding new entry "ou=Admins,dc=pomacintegrations,dc=com"
adding new entry "uid=cpoma,ou=Users,dc=pomacintegrations,dc=com"
adding new entry "cn=cpoma,ou=Groups,dc=pomacintegrations,dc=com"
adding new entry "cn=ldapOSAdmin,ou=Groups,dc=pomacintegrations,dc=com"
Step 13) Perform Client Configuration on LDAP Server
The easiest way to do this is to use the authconfig-tui utility. It will not set all of the options to optimally configure LDAP and SSSD support. It will configure it to
"work". Later, I'll come back and describe the extra changes needed to better configure LDAP.
[root@demo ~]#
authconfig-tui
See graphics.

Fill in your accurate IP and Base DN info
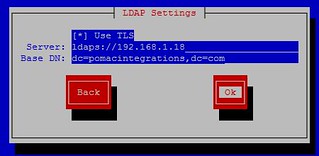 Edit /etc/sssd/sssd.conf, Add the following the the [domain/defaults] section
ldap_tls_cacert = /etc/openldap/cacerts/ca-bundle.crt
Register the SSSD service options
[root@demo ~]#
authconfig \
--enablesssd \
--enablesssdauth \
--enablelocauthorize \
--enableldap \
--enableldapauth \
--ldapserver=ldaps://192.168.1.18:636 \
--enableldaptls \
--ldapbasedn=dc=pomacintegrations,dc=com \
--enablerfc2307bis \
--enablemkhomedir \
--enablecachecreds \
--update
[root@demo ~]# service sssd restart
Step 14) Test
[root@demo ~]# ldapsearch -x -b "dc=pomacintegrations,dc=com"
(Database contents will be listed)
[root@demo ~]# getent passwd cpoma
cpoma:*:20001:20001:Craig Poma (XXX-XXX-XXXX):/home/cpoma:/bin/bash
[root@demo ~]# id cpoma
uid=20001(cpoma) gid=20001(cpoma) groups=20001(cpoma)
[root@demo ~]# ssh cpoma@localhost
Fedora release 20 (Heisenbug)
cpoma@localhost's password: HelloWorld
Creating home directory for cpoma.
[cpoma@demo ~]$
Server Summary
As you can see, we can now login using LDAP on the Server. Next we need to configure the clients. They are pretty easy to configure. You just need to distribute the keys to them (owned by root in this case), update the /etc/openldap/ldap.conf file, and run the authconfig-tui utility.
LDAP Client Configuration
Coming Soon... (it's in the above...kind of)
- yum install openssl gnutls-utils openldap-clients sssd-common
- Perform Step 3 (See note in Step 1 if you want SUDO to work via LDAP on Clients)
- Copy Certs to the correct directories on the client from Step 9 . They should be owned by root
- Perform Step 13
- Done.... I'll expand later... it is late...


